
THE Q & A SERIES
HOW TO DO A BROAD BACK ADJUSTMENT
Hi Emily,
I really love your patterns and have made several! I have a question about the ruffle top - I have broad shoulders and find that the pattern restricts my arm movement. I’m not sure if it’s a result of my broad shoulders, but I then often find the arm holes also make me feel super restricted. How do I adjust fit for my broad shoulders and get more depth through the armhole without everything getting really baggy? I have broad shoulders but am also tall and lean!
Thanks,
Anna
Dulacca, Australia
Hi Anne,
Thanks so much for the lovely compliment. It’s always great to hear feedback from our customers, especially good feedback!
From your description, it sounds like you need to do a broad back adjustment. (And, you’d probably be surprised at how many of our Curated by ITF members have added this to their standard pattern adjustments list!)
Here’s what you need to know…
WHEN TO MAKE THIS ADJUSTMENT
When fitting your toile / muslin, you should check you are happy with the fit of the back. Put your arms out in front of you (parallel to the floor) and check that the range of movement in the back is comfortable, and fabric is not digging in anywhere. Be sure to sew the sleeves into your toile so you can check there is enough room across the back. If you feel like the garment is pulling, digging in or restricting your movement across your back, you may need to do a broad back adjustment.
We included this tutorial in our Cartwright Fit Kit (along with a host of other fitting tutorials), so the illustrations show you how to do the alteration on a dress, but the process is the same for a top, like the Peppermint Ruffle Sleeve top.
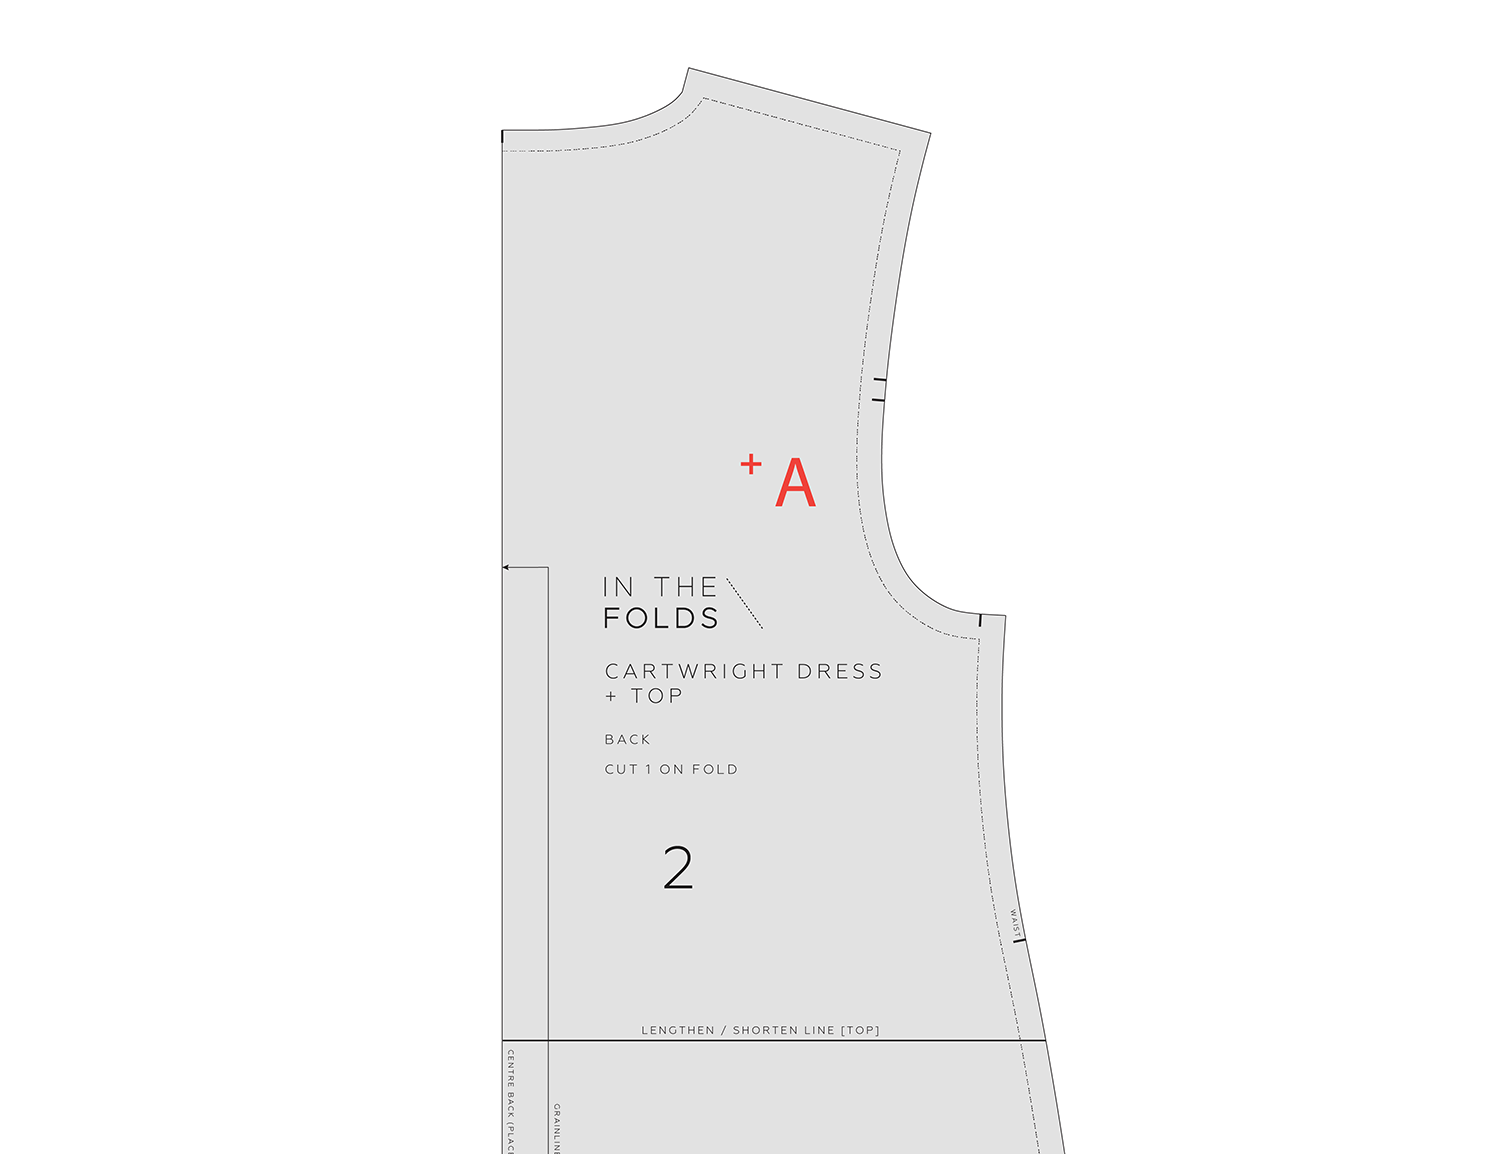
Step 1
Referring to your toile, find your shoulder blade or where the garment is pulling the most. Mark this point on the pattern. We will call this point A.

Step 2
Draw a line perpendicular to the CENTRE BACK line running through point A, from the middle edge of the piece through the armscye. We will call this line B.
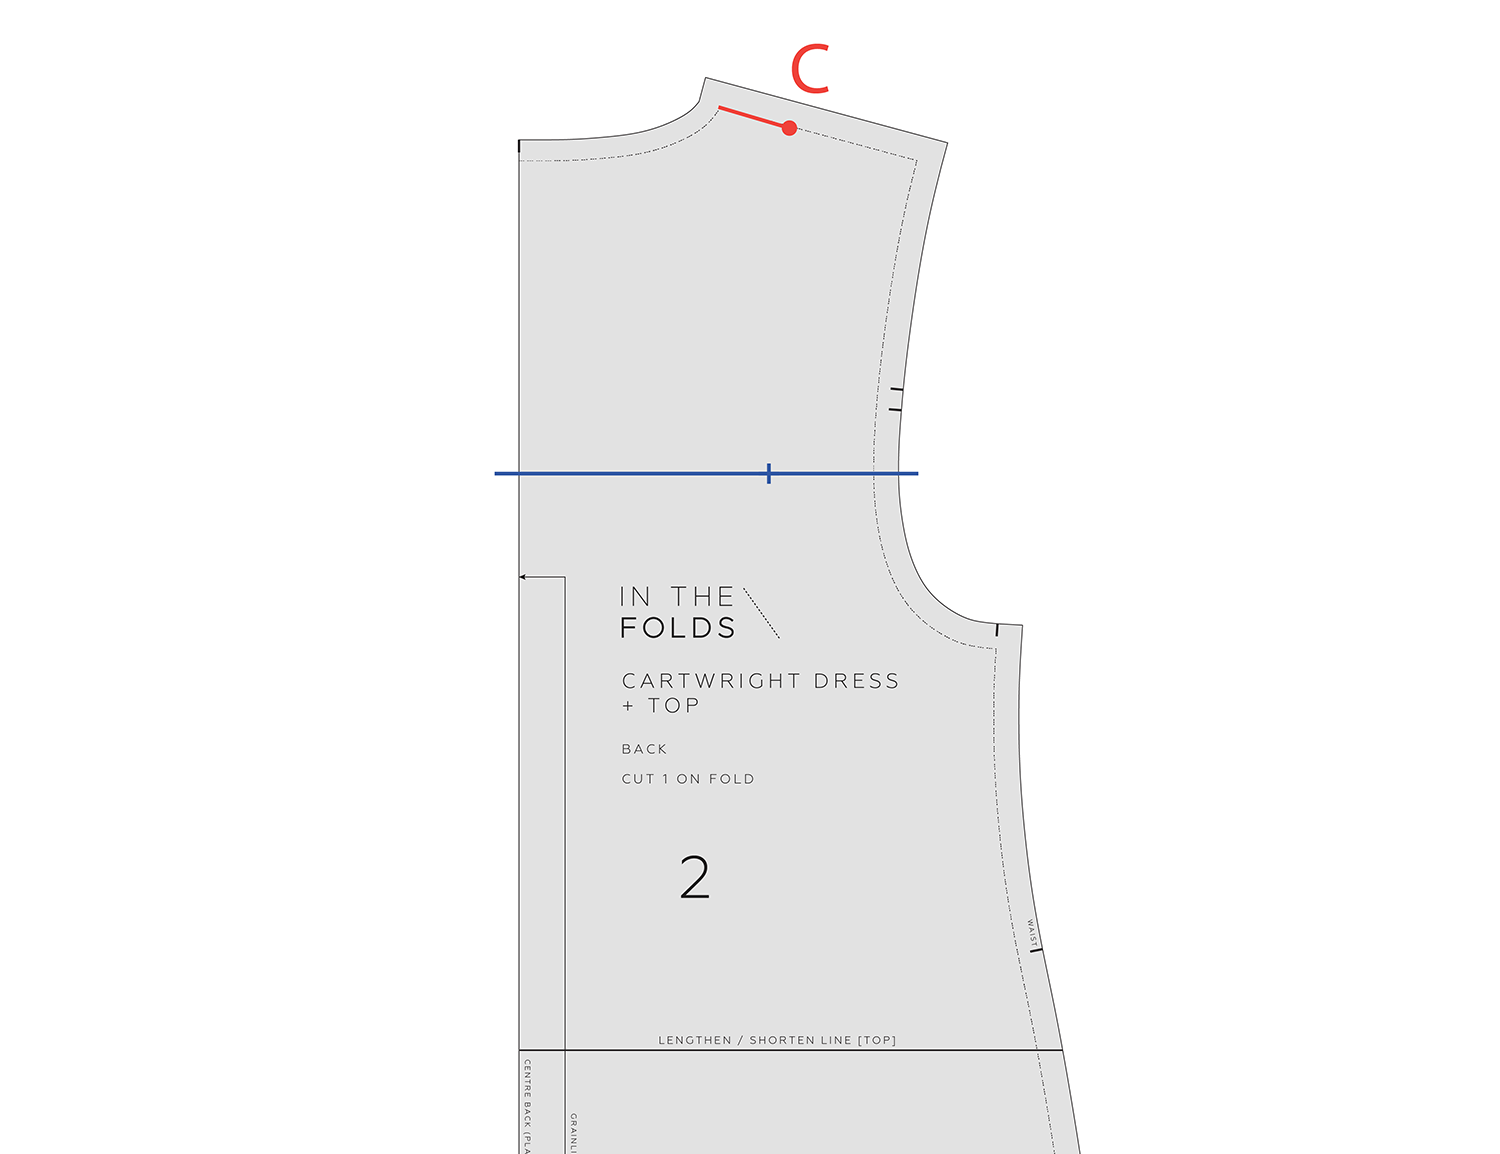
Step 3
Measure the length of the shoulder STITCH LINE and divide the result by 3. Mark this distance from the neck point on the STITCH LINE. We will call this point C.

Step 4
Draw a line from C down to the hemline, parallel to the CENTRE BACK line. We will call this line D.
Step 5
Cut up line D, starting at the hemline. Stop 1-2mm from point C. Cut in from the outer edge of the shoulder seam allowance. Stop 1-2mm from point C, creating a hinge.

STEP 6
Slide paper underneath the pattern. Using line D to access line B, cut along line B towards the armscye STITCH LINE. Stop cutting 1-2mm from the STITCH LINE.
Cut in from the outer edge of the armscye seam allowance. Stop 1-2mm from the STITCH LINE to create a hinge.
Step 7
Keep the CENTRE BACK line straight and swing open line D. Tape CENTRE BACK section to paper underneath to keep it in place.
Mark the amount you need to add to the back width by extending line B by the amount required. We will call this point E.

STEP 8
Slide the armscye section of the pattern over until the cut edge meets point E. Tape the shoulder section.

STEP 9
Swing the bottom section around so that the hem line is touching on each side of line D. The hem will be slightly shorter on the outer edge.
STEP 10
Take a ruler and mark in the new shoulder CUT LINE with a straight line. Re-draw the armscye with a smooth curve.
Re-draw the hem line with a smooth curve over the alteration.
Cut out the pattern piece to remove excess paper.
COMMUNITY TIP
As a designer and patternmaker, I am constantly learning. I learn within my own practice from trying to figure things out as I draft new patterns, and I learn constantly from our amazing Curated by ITF community.
This week I saw this great tip from Rachael (read more about Rachael here!) related to broad back adjustments and thought I’d include it here.


What's worked for me with the broad back adjustment, since I was just trying to add width in a very specific area, is to make a lot of smaller cuts to adjust in that specific area with more nuance. It works best if you can get someone to draw on the toile exactly where the fabric is pulling so you know precisely where you need to add it in.
- Rachael, Curated by ITF member
I hope this helps you with your broad back fitting, Anne! It’s always a pleasure to help makers sew a wardrobe they love, that fits perfectly!
Happy sewing,
Emily
RESOURCES MENTIONED IN THIS ISSUE
The Peppermint Ruffle Sleeve top is a pattern we designed in collaboration with Peppermint magazine. You can download it for free here.
More information about our Curated by ITF membership can be found here. Sign up during the month of August to get the Malvern culottes pattern delivered straight to your inbox.
The Cartwright dress & top pattern can be found here.
For more issues of the Q & A series, you can check out the archive here.
WHAT YOU’VE BEEN MAKING

Hove jacket made by @nuggetwithaneedle

Hacked Marden shirt made by Curated by ITF member, Lise.

